
Universal robot arm as .NET WPF application#
Warning
Update 2025-11: I noticed that controlling individual robot movements using individual C# functions is not reliable and also does not reflect the reality how UR robots are programmed. I use URScript for the robot program and send it via simple TCP/IP functions to the robot, which I explain here:
https://industrial-programming.aydos.de/week08/item-sorter-robot-real.html
Previously, we created an app that picks up and releases an object. The application we created in the previous post focuses on the usage of the class UniversalRobot using top-level statements. Moreover it uses a console, which may be not convenient to use compared to a graphical user application.
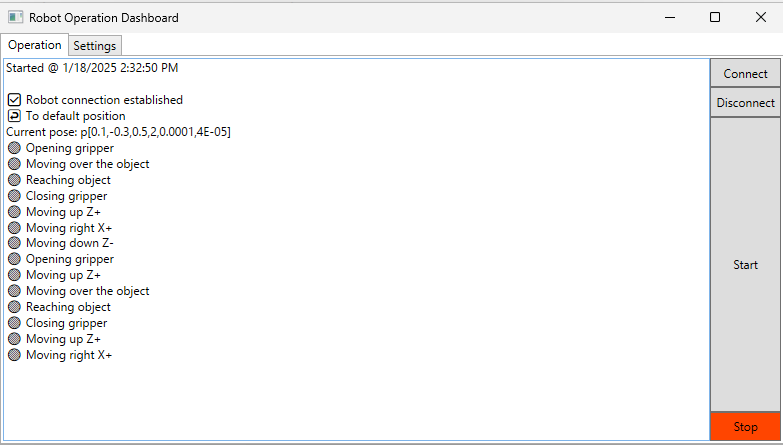
In the following we will setup a graphical WPF (Windows Presentation Foundation)-based application and replace the console with a window. WPF supports you to build a graphical user interface.
Creating the C# project#
Click on
Create a new project. A list of project templates will be displayed.Use the search bar and search for
wpf.Click on
WPF Applicationthat is forC#and thenNext.Name your project, e.g.,
RobotTestGraphicalthen clickNext.Additional informationwindow will open up asking e.g., for which .NET framework to use.Leave default settings and click on
Create. The IDE window will show up withMainWindow.xamlandMainWindow.xaml.csfiles open. The first file will have the focus.-
Build your project by pressing
F5. A white window should pop up.🎉 You have a working program!
Close your program by closing the window. Now you should be back on
MainWindow.xaml.
Example application that integrates our previous robot control logic#
Install
UniversalRobotslibrary using the NuGet package manager as in the previous post.-
If you only want to browse the files to copy some code, browse the code on the repository. Otherwise:
You can directly download the files here:
After downloading copy the files and paste them into your project.
Build your project. You should see the user interface.
Ideas used in this example project#
Separation of concerns#
In a graphical app, we have a graphical user interface which can grow in complexity. Complexity is prune to errors, so we should separate responsibilities or concerns if a component of our program grows.
The WPF framework template already enforces some separation of concerns by its project structure. App and MainWindow are separate. App should be responsible for the business logic and MainWindow for presenting information to the user and interaction.
Due to the low complexity of this example, I did not try to separate the business logic from the presentation logic completely. This step requires defining clear interfaces between these components, which is not the primary goal when creating a simple prototype.
Nevertheless, as an example for separation of concerns, I created a separate class for the robot command sequences called RobotProgram.
MainWindow instantiates UniversalRobot and RobotProgram and RobotProgram uses UniversalRobot to send commands to the robot.
Another aspect enforced by WPF is the separation of graphical structure and the functions-related to the interaction. xaml file is based on XML and is similar to HTML that you may be already familiar with. The xaml files describes the structure of a window and the events associated with them. An example event is Click on a button. For example <Button ... Click="buttonClicked" ... will execute the function buttonClicked whenever the user clicks a button. The function buttonClicked must be implemented in the corresponding C# code MainWindow.xaml.cs
Use of events#
In a GUI application, many back-end (business logic) components may want to communicate to the GUI. Instead of using a GUI function like printThisOnTheGUI, they can send strings to the room (metaphorically) and interested parties can receive them. RobotProgram uses EventHandler to do this. MainWindow listens to these events and prints them on the log screen
Use of asynchronous functions#
Our robot program can take many seconds. If we activate the sequence directly using a button, then the GUI must wait until the program completes and run its GUI-related functions like interaction with the user. This leads to a non-responsive GUI. We typically say GUI freezed.
To avoid this, we should create subprograms that run separately from the GUI program. An example is:
private void StartClicked(object sender, RoutedEventArgs e)
{
    Task.Run(() => robotProgram.Run());
}
Use of columns and rows#
Columns and rows in a grid can structure the elements in a convenient way. Example:
<Grid>
    <Grid.RowDefinitions>
        <RowDefinition Height="*" />
        <RowDefinition Height="*" />
        <RowDefinition Height="10*" />
        <RowDefinition Height="*" />
    </Grid.RowDefinitions>
    <Grid.ColumnDefinitions>
        <ColumnDefinition Width="10*" />
        <ColumnDefinition Width="*"/>
    </Grid.ColumnDefinitions>
    <TextBox x:Name="Logs" TextWrapping="Wrap" Text="" Grid.Column="0" Grid.RowSpan="4" FontFamily="Segoe UI Emoji"/>

    <Button x:Name="Connect" Content="Connect" Grid.Column="1" Grid.Row="0" Click="ConnectClicked"/>
    <Button x:Name="Disconnect" Content="Disconnect" Grid.Column="1" Grid.Row="1" IsEnabled="False" Click="DisonnectClicked"/>
    <Button x:Name="Start" Content="Start" Grid.Row="2" Grid.Column="1" IsEnabled="False" Click="StartClicked"/>
    <Button x:Name="Stop" Content="Stop" Background="OrangeRed" Grid.Row="3" Grid.Column="1" IsEnabled="False" Click="StopClicked"/>
</Grid>
First we declare each row and column available on our grid. The * notation allows describing the size of elements relative to each other. For example, the element with Width="10*" will be 10 times larger than an element with *.
Grid.RowSpan allows an element to span over many rows.
Use of IsEnabled to enable or disable GUI elements#
The xaml files describes the default state of the GUI elements:
<Button x:Name="Disconnect" Content="Disconnect" Grid.Column="1" Grid.Row="1" IsEnabled="False" Click="DisonnectClicked"/>
This information can be changed during runtime of the program, which is described in C# code.
private void DisconnectClicked(object sender, RoutedEventArgs e)
{
    robot.Disconnect();
    Disconnect.IsEnabled = false;
    Start.IsEnabled = false;
    Stop.IsEnabled = false;
Persisting settings#
Settings like IP and license data should be persisted when the app is closed and opened. This can be implemented by creating a settings file and loading it when the program starts.
Using a for loop to repeat similar robot sequences#
Loop is a superpower of a computer. If we have similar sequences, we can repeat these using a loop:
for (int x = 0; x < 2; x++)
{
    for (int y = 0; y < 2; y++)
    {
        var movingOverPose = new Pose(.125 + x * .05, -.425 + y * .05, -.08, 3.1, 0, 0);
        var grippingPose = new Pose(movingOverPose);
        grippingPose.Z -= 0.05;
Creating functions and using meaningful variable names to make the code more readable#
If you use movej most of the time with another function that checks whether the position is reached, then we could pack these two function into a single function.
public void MoveJ(Pose pose, double acceleration = 1.4, double velocity = 1.05, double time = 0, double blend_radius = 0)
{
    SendMoveJ(pose, acceleration, velocity, time, blend_radius);
    while (!GetPose().IsClose(pose)) ;
Moreover, using good variable names, e.g.:
var movingOverPose = new Pose(.125 + x * .05, -.425 + y * .05, -.08, 3.1, 0, 0);
var grippingPose = new Pose(movingOverPose);
grippingPose.Z -= 0.05;
These will make your robot control sequence more readable.